How to Use a Protractor: A Step-by-Step Guide (2026)
reviewed by Jo-ann Caballes
Updated on May 5, 2026
Key Points
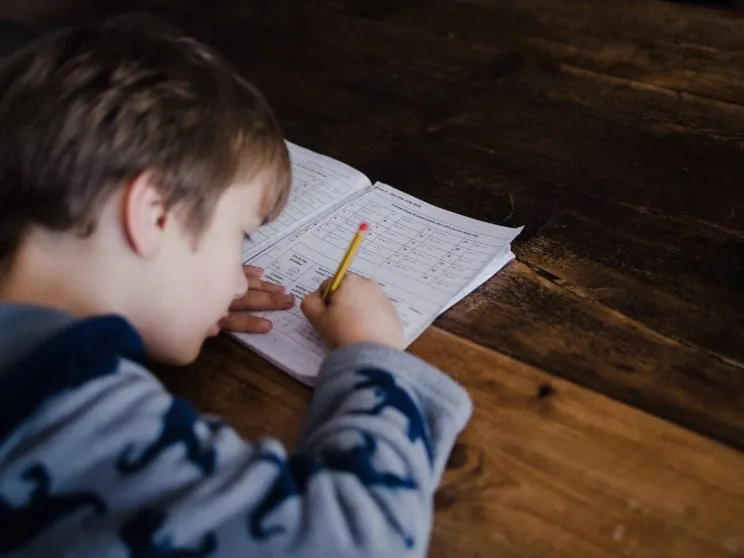
By 4th grade, most kids pick up a protractor for the first time and get stuck on those two number scales right away. Here’s the short answer: line up the vertex with the center hole, align one ray with the 0° line, and read the scale that starts from that side. But the details matter. Follow this step-by-step guide on how to use a protractor and you’ll know exactly how to explain it to your child clearly.
What Is a Protractor?
A protractor is a measuring tool in math designed to measure and draw angles in degrees. A protractor is transparent and marked from 0° to 180° on the inner and outer corners. With the help of a protractor, students can create accurate geometric figures, understand angles in geometry, and more.
Explore Brighterly Learning Experience
Learn exactly how Brighterly helps students thrive through expert sessions, online tools, and proven feedback from thousands of satisfied parents
What Is a Protractor Used For?
The use of a protractor is to measure and draw angles in degrees. Kids use it to find out if an angle is small, large, or a right angle. It comes in handy in school, for math projects, or any time students need to work with angles that require precision.
Using a protractor may seem simple at first, but the two number scales trip up students at every level. Even those searching for a protractor tutorial for beginners often find the inner and outer scale the trickiest part to master.
Parts of a Protractor
To read angles on a protractor correctly and avoid any future inconsistencies, your kid should understand all the basic parts of the tool.
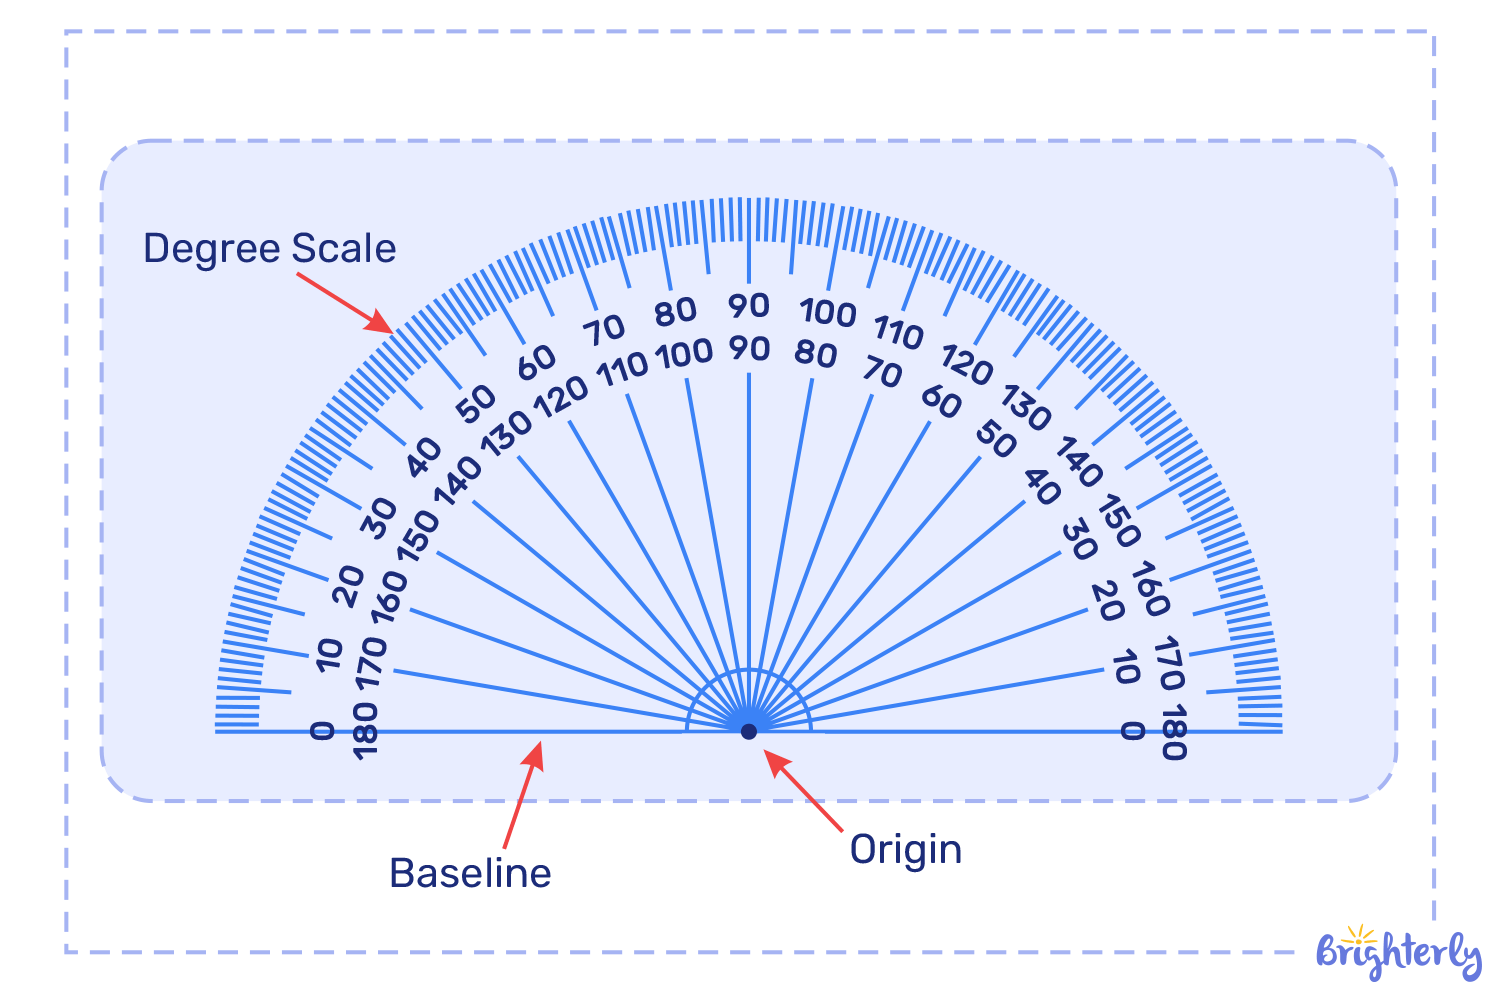
Baseline
The baseline of a protractor is a horizontal line at the bottom, also called the reference point. A vertical line bisects the baseline of a protractor at its center point. Since the baseline has two sides, they are called left and right-side baselines.
Origin
The origin of a protractor is a point where the baseline and the perpendicular line meet at the bottom. A vertical line cuts the baseline precisely in the middle, through the origin. This place is also called the center or midpoint. When you teach how to use protractor for kids, the origin is where you should start your explanation.
Degree Scale
When your child first handles a protractor, they may notice long and short lines.
- Each short line inside a semicircle represents a degree, and the total number of degrees is one hundred and eighty (180). There are tiny line segments for every one degree (1), with extra line segments for every five (5) and ten degrees (10) in between.
- The inner degree scale runs from 0 to 180 degrees, rotating anticlockwise from the right side of the protractor. The outer degree scale shows the numbers rotating clockwise from the left side of the semicircular degree scale.
With an understanding of these crucial parts, your child will quickly grasp how to measure angles with a protractor.
How to Read a Protractor?
Reading a protractor is simple with these 3 easy steps:
- Align the angle’s vertex with the dot at the protractor’s center.
- Place one side of the angle along the 0-degree line on the protractor.
- Check where the other side of the angle intersects the number scale on a protractor.
If your child picks the wrong scale at step 3, Brighterly’s online math tutors spot that gap fast and build a personalized plan around it. Our tutors are certified professionals who teach strictly to US education standards. To make every lesson genuinely exciting for kids, our tutors prepare animated presentations, games, and hands-on challenges for each session. That’s our online math program in action.
Brighterly tutors prepare every lesson personally, so kids stay engaged and keep growing. 

US-Certified Math Tutors For Your Child
How to Use a Protractor to Measure Angles
Measuring angles accurately takes five steps. Work through them with your child until the sequence feels natural:
- Identify the vertex. Find the point where the two rays of the angle meet.
- Place the protractor center on the vertex. Line up the small hole or center mark exactly on that point.
- Align one ray with the 0° line. Choose either the left or right baseline whichever matches your ray.
- Identify which scale starts at 0 on that side. The protractor has two scales: inner and outer. Your child reads the one that begins at 0 where the ray sits.
- Read the degree where the second ray crosses that scale. That number is the angle measurement.
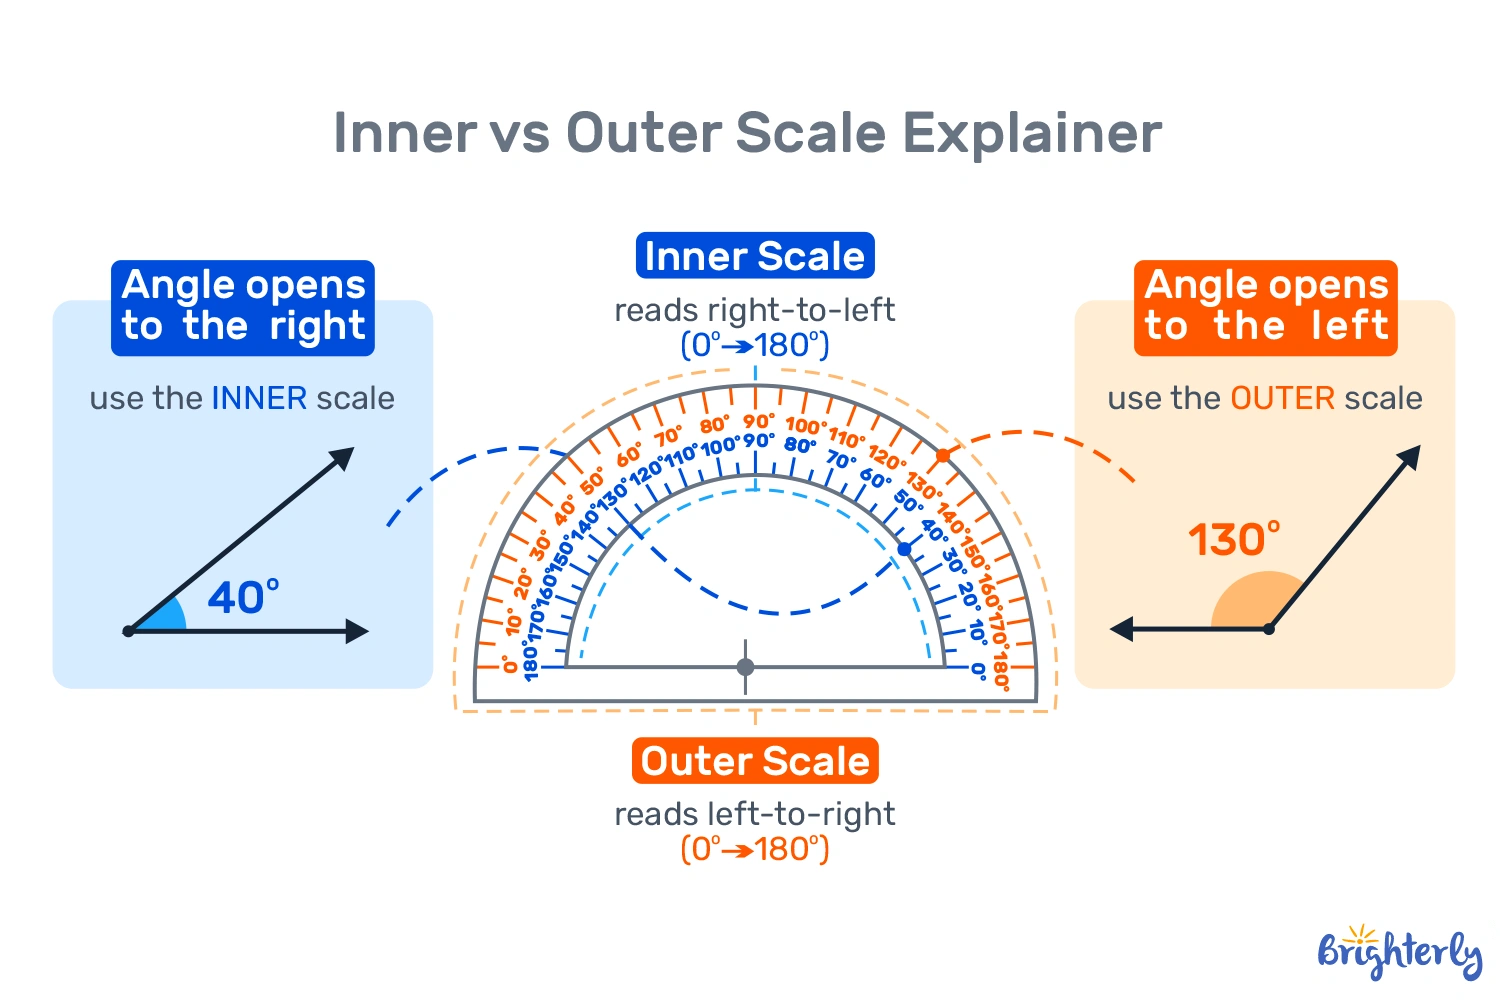
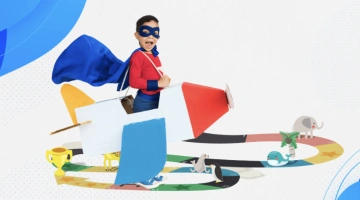
How to Read the Inner and Outer Scale
This is where most kids get confused and it’s completely understandable. Every protractor carries two number scales: the inner scale runs right-to-left (0 –180), and the outer scale runs left-to-right (0 – 180).
The trick is simple: always read the scale that starts at 0 on the side where your ray sits.
When your child isn’t sure which scale to use, the 90° test helps every time:
- If the angle looks smaller than a right angle, the answer lives under 90° – your child reads the inner scale.
- A wider-than-90° angle tells its own story: the answer sits above 90°, so your child switches to the outer scale.
That one check eliminates the most common reading mistake in one second.
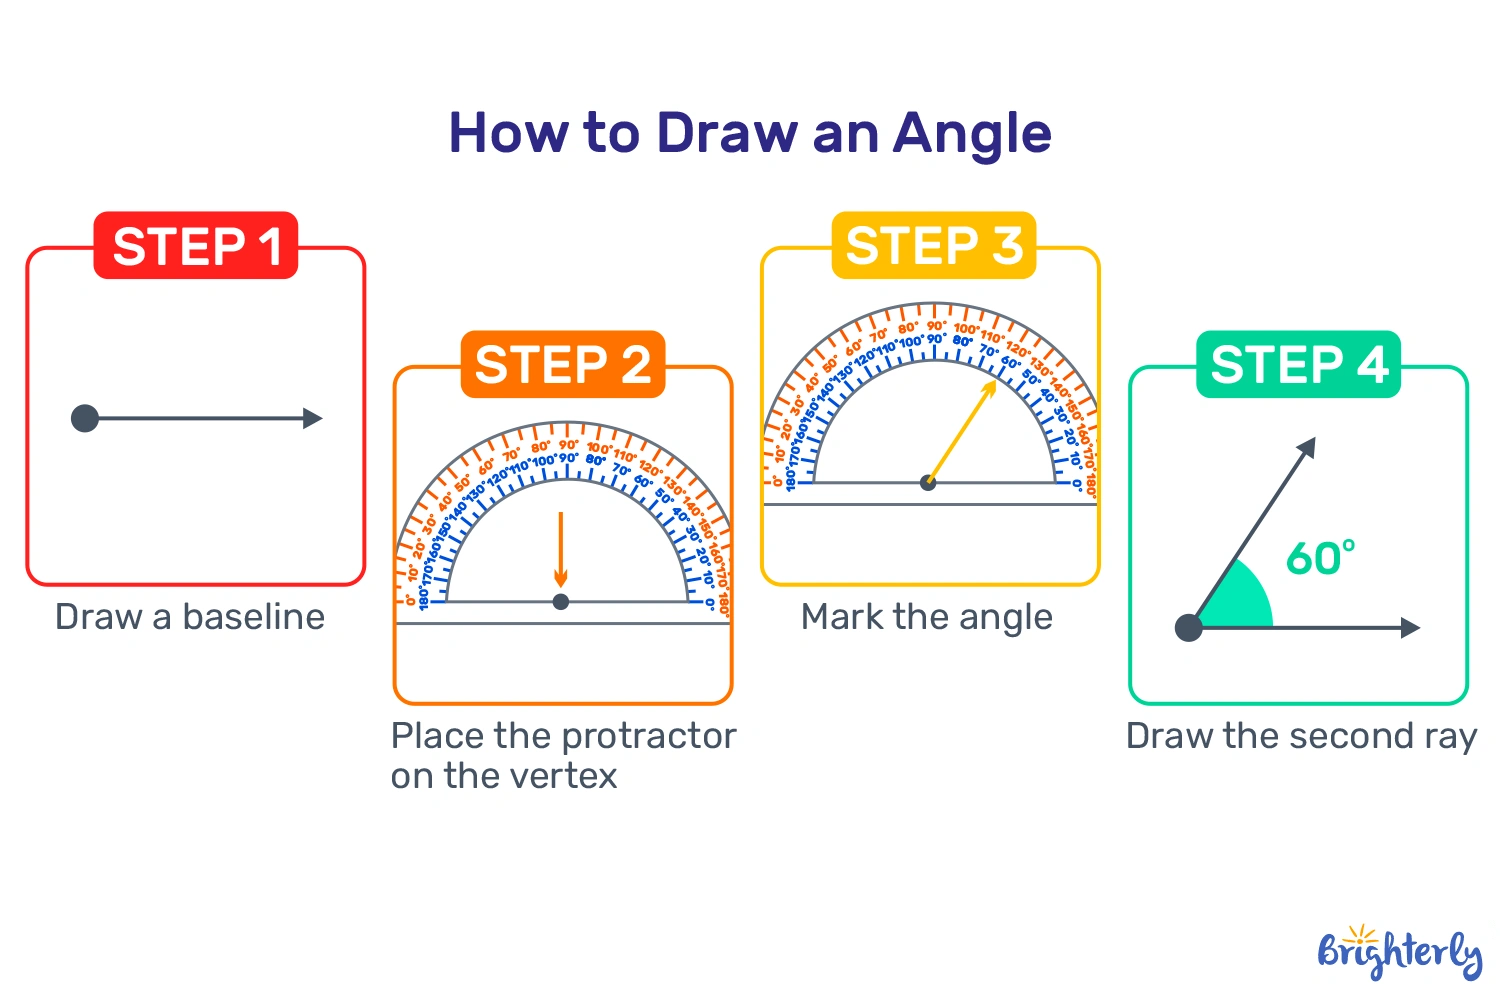
How to Use a Protractor to Draw an Angle?
Drawing an angle with a protractor follows the same logic as measuring, in reverse. Here’s how your child draws a precise 60° angle in five steps:
- Draw a baseline ray. Use a ruler to draw a straight ray and mark the endpoint. This point becomes the vertex.
- Place the protractor center on the vertex. Line up the center hole exactly on the endpoint of the ray.
- Find 60° on the correct scale. Identify which scale starts at 0 on the side of the baseline ray, then follow that scale to 60°.
- Mark the point. Place a small dot at the 60° mark on the protractor.
- Draw the second ray. Remove the protractor and use a ruler to draw a ray from the vertex through the dot.
The angle between the two rays measures exactly 60°, an acute angle, smaller than a right angle.
How to Use a Protractor for Kids: Teaching Tips
These practical tips help parents and teachers guide kids through protractor practice step by step:
- Start with the numbers. Explain what the degree scale means before anything else. Remind your child to always check which scale starts at zero on their side of the angle.
- Place the origin first. Help your child set the origin exactly on the vertex and align one ray with the baseline before reading any measurement.
- Read the scale carefully. Your child follows the second ray up to the scale and reads the degree where it lands, always double-checking they’re on the correct scale.
- Practice with triangles. Once your child feels confident with single angles, challenge them to measure all three angles inside a triangle. That practice builds accuracy fast.
- Reinforce angle types. A quick reminder helps your child interpret results correctly:
- Acute – less than 90 degrees
- Right – exactly 90 degrees
- Obtuse – more than 90 degrees
- Test understanding regularly. Math tests are a great way to check how well your child applies what they’ve learned.
For extra practice at home, our measuring angles with a protractor worksheets give kids structured exercises with answer keys ready to use – no prep needed. And if your child needs more guidance, a Brighterly 4th grade math tutor can walk through each step one on one.
Brighterly's 1-on-1 online math tutors help kids master angles and everything beyond
Still Confused by Scales and Degrees?
Common Protractor Mistakes to Avoid
Determining angles with protractors gets easier once your child knows which mistakes to watch for.
- Rushing the setup. Kids often drop the protractor down and start reading before everything lines up. Remind your child to pause, breathe, and check the placement first, that one habit prevents most wrong answers before they happen.
- Reading the wrong scale. Two scales live on every protractor, and kids naturally grab the wrong one. Before your child reads any degree, they check which scale starts at 0 on the ray’s side and follow that same scale all the way to the answer. Switching mid-measurement is where the confusion begins.
- Misaligning the vertex. Your child places that tiny center hole exactly on the angle’s corner not nearby, exactly. Even a millimeter of shift throws the whole measurement off. Build this into a routine: place, check, then measure.
- Misreading obtuse angles. If the angle looks wider than a right angle, your child knows the answer must sit above 90°. When the number on the scale disagrees with what the angle clearly shows – your child simply switches to the other scale and re-reads.
What to Use If You Don’t Have a Protractor?
You donʼt need to panic if you don’t have a protractor at home. Here are a few life hacks for replacing the instrument with improvised means.
Print a Protractor
You can practice measuring angles with a protractor in its printable version. Download the protractor in PDF format. This improvised tool is handy because it lets you make many copies. So, if your child damages anything, you can get them a new one.
However, note that experts don’t recommend using this alternative regularly. The thing is that the measurements may be off. Sometimes, you may end up with degree scales that are either less or more than those on a standard protractor.
Using a Clock Face
Your child already knows a clock and that makes it a perfect angle tool. Picture the clock hand moving from 12 to 6, that movement traces an angle kids can see and feel. Every hour mark represents 30 degrees.
So if the clock hands point to 3 and 6, your child counts three hour marks and multiplies: 3 × 30 = 90 degrees. That’s a right angle: visible, concrete, and easy to remember. Use this technique to estimate angles that match familiar clock positions.
Paper Folding
For kids, paper folding shows how to use a protractor for kids. For this method, your kid just needs a piece of paper. First, help them fold the paper along one side of the angle to align the edge with the other side. After folding, examine the angle formed by the crease.
This technique is excellent for defining right angles. But it’s also limited to this angle type only.
Compass and Ruler
The compass-and-ruler method is the most precise of the four alternatives. Your child needs a compass and a ruler.
- First, ask them to draw a line or a part of the angle with the ruler.
- Tell them to place the compass on one endpoint of the line and draw an arc. Then, move the compass to the other endpoint and draw another drawing arc.
- The intersection of these two arcs will be the angle’s vertex.
- Help them use the ruler to measure the angle between the two rays.
This method uses the principles of circles and radii and so measures angles accurately.
Frequently Asked Questions (FAQ)
What Is the Difference Between the Inner and Outer Scale on a Protractor?
Every protractor carries two number scales. The inner scale runs right-to-left (0°→180°), and the outer scale runs left-to-right (0°→180°). Your child picks the scale that starts at 0° on the side where their ray sits and reads that same scale all the way to the answer.
How Do You Measure an Obtuse Angle with a Protractor?
Your child places the center hole on the vertex and aligns one ray with the 0° line, same as always. For an obtuse angle, the answer must land above 90°. If the scale shows something under 90°, your child switches to the other scale and re-reads. That quick check prevents the most common obtuse angle mistake.
At What Grade Do Kids Learn to Use a Protractor?
Most kids meet a protractor in 4th grade, when the US math curriculum introduces angle measurement for the first time. As of 2024, US math Standards place protractor skills squarely in 4th grade, students learn to measure angles in whole-number degrees and sketch angles of a specified measure. Many children revisit and sharpen this skill in 5th grade geometry.
How to Use a Protractor for Beginners?
Following how to use a protractor step by step makes everything click. Place the center hole on the vertex, align one ray with the 0° line, and read where the second ray crosses the scale. Always check which scale starts at 0° on your child’s side first, that one habit prevents most beginner mistakes.
Which Side of a Protractor Do You Use?
Your child uses the side that matches where their ray sits. If the ray points to the right, your child reads the scale that starts at 0° on the right. If the ray points left, your child reads from the left. The direction of the ray always decides which side to use.
Can You Use a Protractor to Measure a Reflex Angle?
A standard protractor only measures up to 180°, so it doesn’t cover reflex angles directly. To measure a reflex angle, your child measures the smaller angle on the other side first, then subtracts it from 360 °. That calculation gives the reflex angle measurement without any extra tools.
How Do You Know Which Number to Read on a Protractor?
Your kid uses the 90° test. If the angle looks smaller than a right angle, the answer sits under 90° – read that scale. If the angle looks wider than a right angle, the answer sits above 90° – switch to the other scale. The shape of the angle always points to the right number.


If your kid starts crying over homework or freezes when a math test begins, they’re most likely experiencing math anxiety. You don’t need to be a math expert yourself to understand what triggers this neurological and emotional block, what signs and symptoms math anxiety entails, and how to help your kid cope with them. What […]
May 05, 2022
Children’s learning environment can have a dramatic impact on how well they learn and how motivated they are in the classroom, whether that’s at home or in a homeschooling environment. Creating a positive learning environment will improve their experiences, confidence and learning outcomes. This guide provides all the information you need to know, including what […]

May 06, 2022
Math & reading from 1st to 12th grade
Looking for homework support for your child?

Choose kid's grade
Math & Reading for Grades 1–12
Build real confidence for your child with a Brighterly math or reading tutor.